3D Multiplayer Games
Date: 2019-11-17
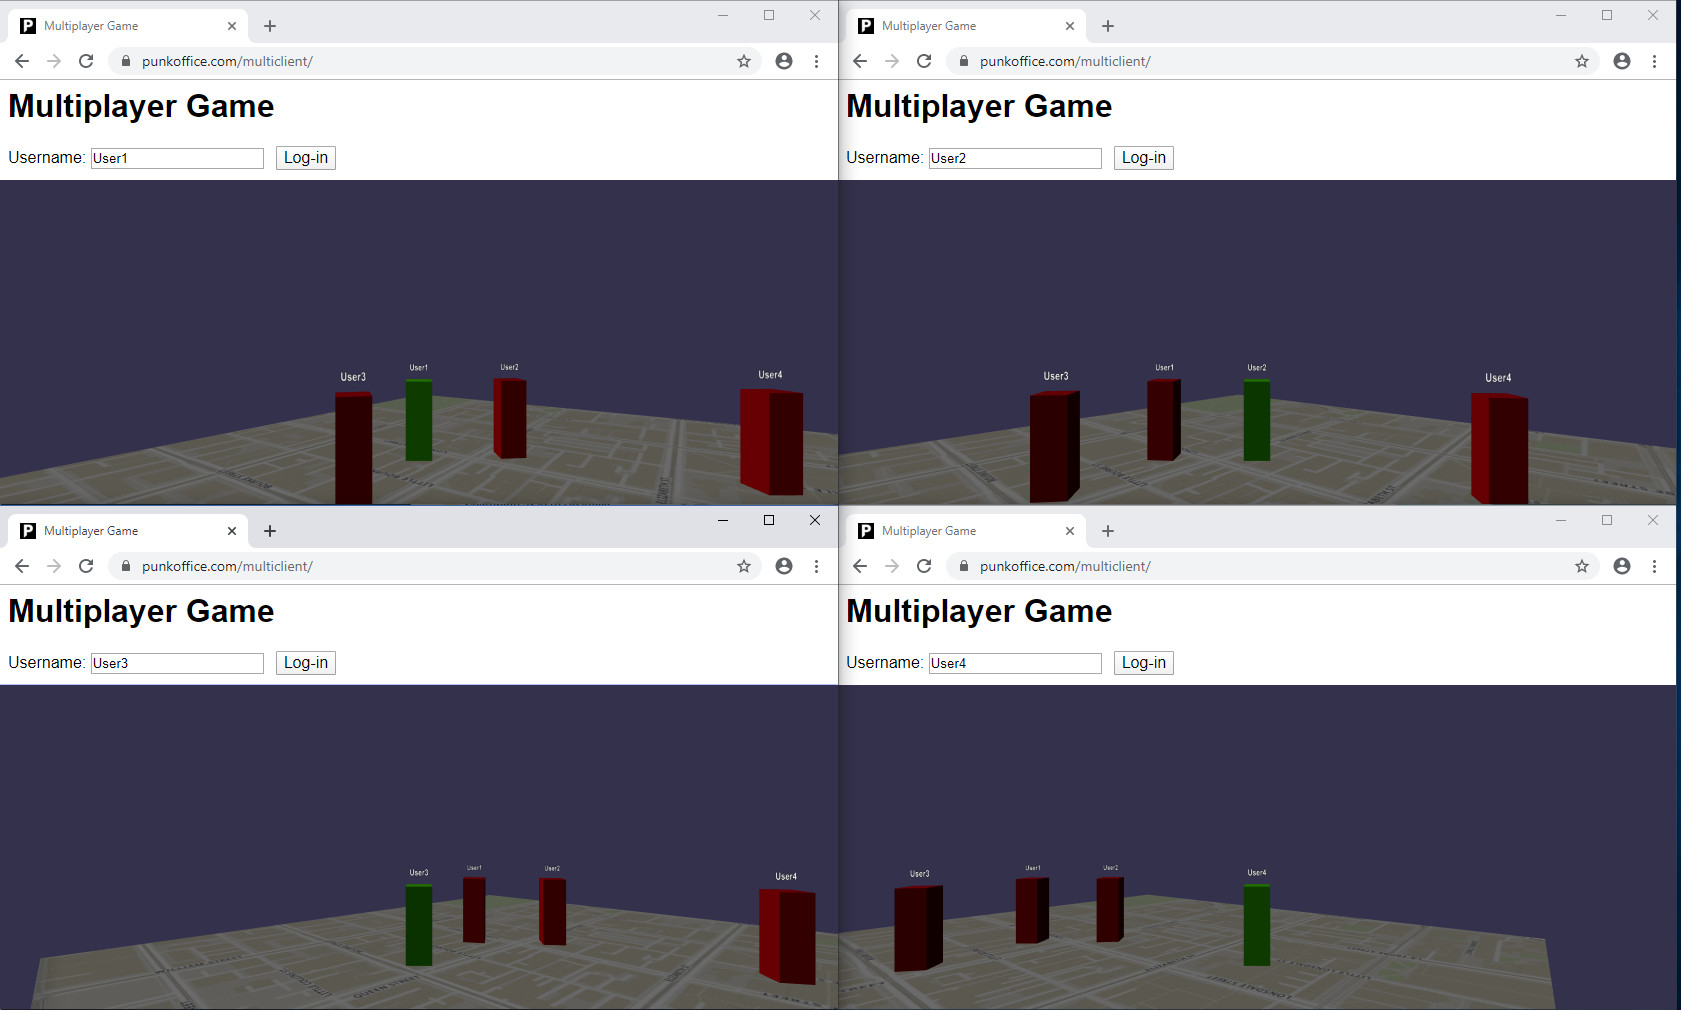
Since the launch of our web-based multiplayer virtual world Threedium, people have been asking for a tutorial on how to build such a system. The Threedium system is quite complex, but if you know the basics, you can build a similar system. In this article we explain how to build a basic 3D multiplayer game that runs in a web browser. We will be using NodeJS as the server and Babylon.js to render the 3D graphics. The language used for both server and client is Javascript ES6.
If you want to test the multiplayer capabilities, just open multiple browser windows.
You can download the full source code of the demo multiplayer server here:
github.com/punkoffice/multiplayer_server/
You can also download the full source code for the demo multiplayer client:
github.com/punkoffice/multiplayer_client
You can play a live demo of this game here:
punkoffice.com/multiclient
To test the multiplayer capabilities, just open up more browser windows and login through those as well.
Architecture
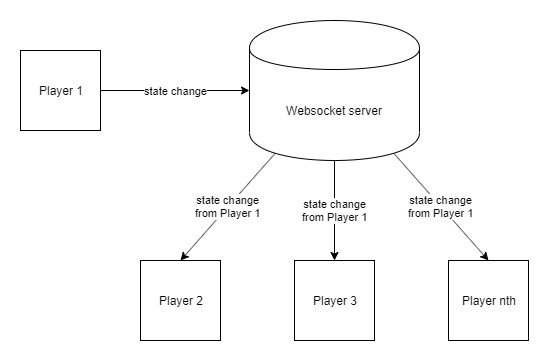
All changes to a player's state is sent to the server.
The server then transmits those changes to all the other players.
Communication
All messages are sent in JSON format with these properties:
- command
- data
Here are some examples of how the JSON record would look.
Sending authentication notice to a player:
{
	"command":"auth",
	"data":"true"
}
Sending player details to all other players:
{
	"command":"playerMoved",
	"data":
		{
			"id":2,
			"username":"Fred",
			"x":3,
			"y":1.5,
			"z":2.3,
			"rotation":2.34
		}
}
Server
Please refer to the file server.js
The server stores the states of the players that must be known in realtime. In this tutorial we are storing player position, rotation and username detials.
NodeJS setup
We'll be using nodeJS for this but the principals are the same for other environments such as .NET or Java.
We'll need to add the "ws" module to configure the web sockets.
You can set up your nodeJS project with these commands:
npm init
npm add ws
You can run the server with this command:
node server.js
Setting Up the Websocket Server
Now lets create a Javascript file server.js
We need to set up a websocket server. Setting host to 0.0.0.0 means we are listening on all available IP addresses that the computer server has. The port is set to 5000. But it can be set to anything, as long as the client also connects to the same port. Remember to enable that port on your server! If you're using an AWS instance, make sure to add it to your security groups.
const WebSocket = require('ws');
const server = new WebSocket.Server({ host: '0.0.0.0', port: 5000 }, () => {
	console.log(`${new Date().toLocaleString()} - Listening on port 5000...`);
});
Now we need to respond to events from the socket server.
server.on('connection', (ws, req) => {
	new Player(ws, req.connection.remoteAddress);

	ws.on('message', message => {
		var objPlayer = Player.find(ws);
		objPlayer.process(message);
	});

	ws.on('close', () => {
		Player.remove(ws);
	});
});
What's happening here is that we are creating a new player for every new socket connection. We are then removing that player when the socket is closed. The socket can be closed due to these actions:
- Player closes browser
- Server intentionally closes the socket
- A socket error
It might seem strange that every socket becomes a player. What if someone connects from a different website? What if they write their own code to connect to our socket server? We work around this by using some kind of authentication. There are many ways to do this. Here we're using a simple method. We need a connection to be followed up by a message containing the player's username. This needs to happen in 2 seconds or we close the socket and remove the player. We set up a timer in the player constructor like this:
this.authTimer = setTimeout(() => {
	if (!this.authenticated) {
		console.log(`${new Date().toLocaleString()} - Player ${this.id} authentication failed`);
		this.socket.close();
	}
},2000);
Player
When a player connects to the server we have this kind of handshake happening:
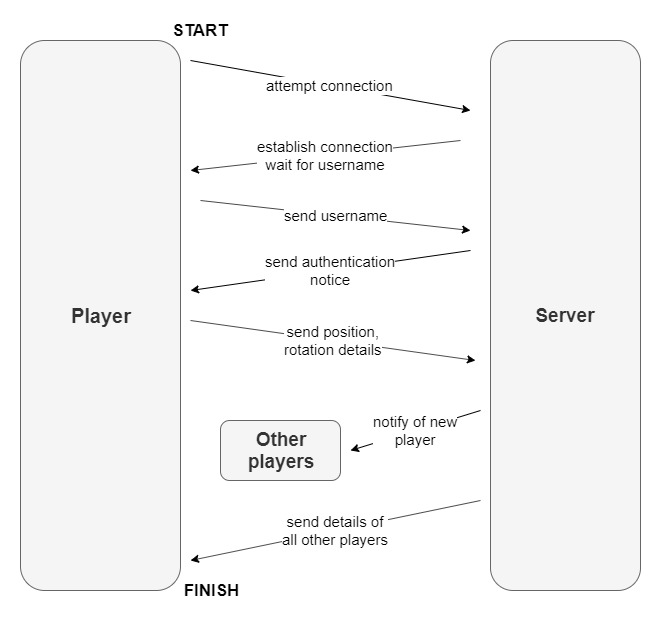
We have a player class that holds information for each player.
The details we are storing are these:
- authenticated? (true / false)
- IP address
- web socket
- username
- x position in the world
- y position in the world
- z position in the world
- rotation
The server looks for these commands from the JSON messages:
- username
- transform
Username
We use usernames to identify players. In this example we're also using it as a way of authenticating a player. Once the user is authenticated we send a JSON message through the websocket to tell the player.
{"command":"auth","data":"true"}
Then we send that player information from all the other players already in the world with this function:
seeAll() {
	for (var objPlayer of Player.all) {
		if (objPlayer.id !== this.id) {
			//Get details from all other players
			this.socket.send(objPlayer.transformJSON());
		}
	};
}
Once the player receives that authentication notice they will send their transformation details back to the server.
Transform
Each transform command is accompanied by data that contains position and rotation information from the player.
The player cannot appear in other player's screens until the first transform command is sent by them.
Once we receive the transform details we can send this update to all the other players.
We create a transform JSON string like this:
{
	"command":"playerMoved",
		"data":
		{
			"id":${this.id},
			"username":"${this.username}",
			"x":${this.x},
			"y":${this.y},
			"z":${this.z},
			"rotation":${this.rotation}
		}
	}
}
We then send that JSON string to all other players like this:
sendToEveryoneElse(json) {
	var _this = this;
	for (var objPlayer of Player.all) {
		if (objPlayer.socket !== _this.socket) {
			objPlayer.socket.send(json);
		}
	};
}
Finding the right player
When we receive a message from a player via the websocket, we need to find the player on the server that corresponds to the player on the client. We can use the socket where we received the message to search through the player list on the server and find the player that has that same socket.
static find(socket) {
	return(Player.all.find(x => x.socket === socket));
}
Logging off
The player leaves the world by closing their browser window. This will close the socket connection. When a socket is closed, it will remove the player with that socket.
ws.on('close', () => {
	Player.remove(ws);
});
Before removing the player, we notify all other players that this one will be gone. We create a JSON message like this:
{"command":"playerGone","data":${objPlayer.id}}
and we send it to everyone else:
objPlayer.sendToEveryoneElse(json);
Once we've done that we can remove it from our list of players and the object will be disposed.
Player.all = Player.all.filter((obj) => {
	return obj.socket !== socket;
});
Client
We have a main file client.js and a bunch of class files:
- avatar.js
- billboard.js
- input.js
- player.js
- socket.js
- world.js
Most of these files deal with creating a standard third-person game environment. Only avatar.js, player.js and socket.js has code to do with server communication.
client.js
Please refer to the file client.js
This gets called after the web page has loaded.
This sets up the UI events, the world and the player system.
UI.setupEvents();
World.init();
Player.init();
avatar.js
Please refer to the file avatar.js
This class makes the avatar move according to the keyboard presses.
Also, every time we move our avatar a message is sent to the server in this format:
{
	"command":"transform",
	"data":
	{
		"x":${x},
		"y":${y},
		"z":${z},
		"rotation":${rot}
	}
}
billboard.js
Please refer to the file billboard.js
This displays a username above the player's heads. The username mesh is in billboard mode so it is always facing the camera directly.
The main avatar and all the players will have one instance of this billboard.
input.js
Please refer to the file input.js
This sets up the controls for the main avatar. You can use arrows keys LEFT, UP and RIGHT (for right-hand) or W,A and D (for left-hand).
This binds keyboard events to the key-down, key-up and blur events. Its necessary to trigger a key-up event on blur, otherwise
if your avatar is walking forward and you click outside the browser, the avatar will continue walking.
If you need mouse or joystick controls you could also put that code in here.
player.js
Please refer to the file player.js
Here is where we store all the other players.
Find player
Everytime we get a message from the server about a player, we must find the player in our global player list. If we can't find the player it means they're new to our world and we must create them.
static find(playerID, username) {
	//Check if player is in our list
	for (var objPlayer of Player.all) {
		if (objPlayer.id === playerID) {
			//Found player, so lets return it
			return(objPlayer);
		}
	};
	//Player doesn't exist, so lets create a new one
	return(new Player(playerID, username));
}
Move player
When we get a move message from the server, we must find the player that is being moved then transform its position and rotation details.
//Find player and move them
static move(data) {
	var playerID = parseInt(data.id);
	var objPlayer = Player.find(playerID, data.username);
	objPlayer.transform(data.x, data.y, data.z, data.rotation);
}

//Change position and rotation
transform(x, y, z, rotation) {
	this.mesh.position.x = x;
	this.mesh.position.y = y;
	this.mesh.position.z = z;
	this.mesh.rotationQuaternion = BABYLON.Quaternion.FromEulerAngles(0, -rotation, 0);
}
Remove player
When we get a message from the server to remove a player, we must find the player that is being removed, destroy its 3D meshes, then remove it from our list of players.
//Remove player from world
static remove(playerID) {
	for (var objPlayer of Player.all) {
		if (objPlayer.id === playerID) {
			objPlayer.destroy();
			break;
		}
	}

	//Remove me from list of all players
	Player.all = Player.all.filter((obj) => {
		return obj.id !== playerID;
	});
}

//Destroy player meshes
destroy() {
	this.billboard.mesh.dispose();
	this.mesh.dispose();
}
socket.js
Please refer to the file socket.js
This class is important because it sets up the connection to the server through websockets.
Host
We've set the socket host as localhost on port 5000 by default. This will work if you are running your server on your local machine. However, if the server is running remotely you'll need to change that host address to the address of the server.
You might want to replace "localhost" with a different server name:
Socket.host = "ws://localhost:5000";
On Open
As soon as the socket connection is established with the server, send the username to the server to authenticate this player.
Socket.ws.onopen = () => {
	console.log("Connected");
	Avatar.username = username;

	//Authenticate with server by sending username
	Socket.ws.send(`{"command":"username","data":"${username}"}`);
};
On Message
We receive all commands from the server and process them through here.
We only process these commands:
- auth - we are authenticated so lets send our position details to server
- playerGone - another player has left the world
- playerMoved - another player has moved
Socket.ws.onmessage = (msg) => {
	var json = JSON.parse(msg.data);
	switch(json.command) {
		case "auth":
			if (json.data === "true") {
				console.log("Authenticated by server");
				Avatar.init();
				Input.init();
				Avatar.send();
			}
			break;
		case "playerGone":
			Player.remove(json.data);
			break;
		case "playerMoved":
			Player.move(json.data);
			break;
	}
};
world.js
Please refer to the file world.js
This is standard code for setting up a 3D scene.
We perform these tasks in this order:
- Setup camera
- Setup lighting
- Create ground
We also create a running loop that does the following:
- Render the scene
- Move avatar if movement keys have been pressed
- Move camera to stay behind avatar
Extra Considerations
Multiplayer games can become very complicated. This tutorial only covers the basics. There are other things you might want to consider when building a multiplayer game.
Optimisations
As game worlds grow it could result in exponentially increasing network traffic, increased lag, an overload of draw calls on the client's screen and consume large amounts of memory from storing all the 3D objects. There are ways to cope with this.
Lag Compensation
It can take a while for a message about a player's updated movement to be received by all other players. It could be the case that what you are seeing is where a player has been 2 seconds ago. You can overcome this by predicting where a player will be from previous movements and placing them there ahead of time, so what you are seeing would match what that player is doing at the point in time MOST of the time. This reduces accuracy because a sudden change in direction of a player could cause a huge correction on the other player's screens.
Internal Clock
There could be a lot of network traffic in a large game if we are sending data every time a change has been made. We could instead use a clock that runs every 50 milliseconds and only transmit position changes then.
Sharding
Really large worlds need to be split into shards so only a small number of objects are loaded and displayed at each time.
Security
Since there are lots of message passing happening, all it takes is for a someone to intercept those messages, or send their own to change the state of the game.
Secure sockets
This server uses an unencrypted socket connection. You can use a secure socket connection instead as long as you provide
certificates that are linked to your server. If your client is HTTPS then you must use a secure socket connection.
(Update: A secure server implementation has been added here secureserver.js)
Handshake authentication
In this tutorial we just send a username to authenticate a user. There are more complicated ways of doing this. For a web based world you can make sure the user connecting to the server is doing so through the client website. When a user is on the client website a session key is created. This can be stored in a database. When the user makes a socket connection they can send that session key through to the server. The server can then check that it matches the one in the database.
Authoritative Client
In this tutorial we are using an authoritative client. That means that the client determines the position of the user and sends that to the server. The problem with this is that the user could easily change their position details in the browser Javascript debugging console thus allowing them to instantly move anywhere. To prevent this you would want to switch to an authoritative server system.
Authoritative Server
With this system only key presses / joystick / mouse movements are sent to the server. The server then calculates how this moves the player, then sends that information to all players, including the one that sent the key presses. This prevents position changes via the Javascript debugging console but it introduces lag. It can be frustrating for a user to press a key, wait for messages to be sent to the server then sent back to the client, then wait for the avatar on the screen to move, especially with a slow internet connection. Here you would need to implement some kind of lag compensation, such as predictive movement.
Data storage
All the data on the server is temporary. If the server is closed or crashes all that data is cleared. Ideally you would want all player information to be stored in a database so it becomes permanent. If a player logs back in the server they can retrieve their last position from the database.